Adobe Commerce - Magento
Before setting up
- Make sure you have admin level access to Magento.
- You can find the
Base URLof your Magento URL. It can look likehttps://magento.testing.organization.com/ - In order to receive the
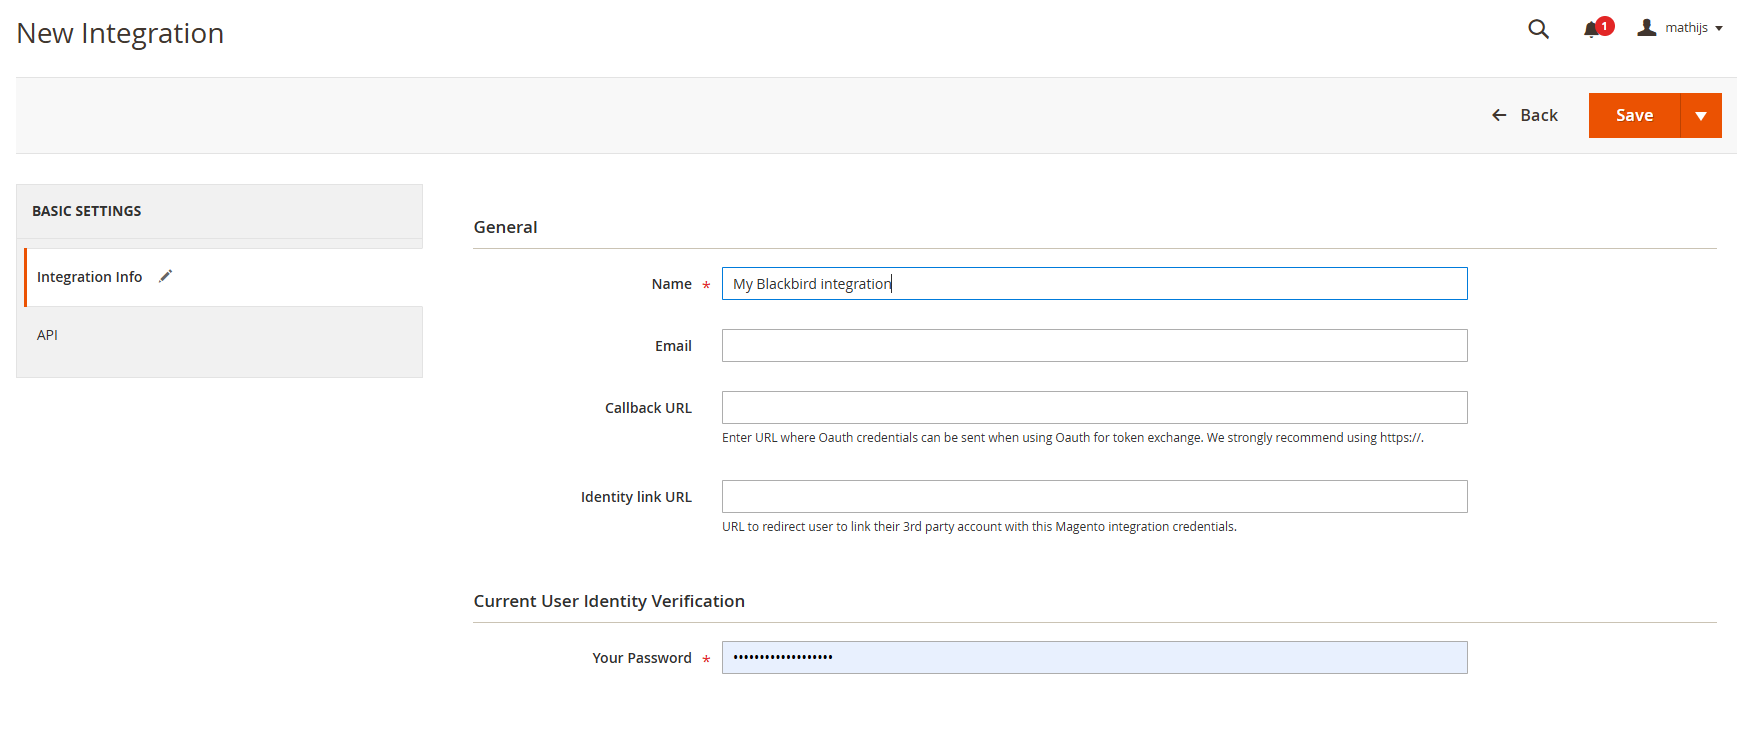
Consumer key,Consumer secret,Access tokenandAccess token secretyou need to create a new integration in your Magento account. Follow the instructions below.
Creating an integration
- Go to
System->Extensions->Integrations. ClickAdd new integration.

- Enter the name of the integration. Click on
APIand select resource accessAll*. Note, that you don’t need to provide any values for theCallback URLandIdentity link URLfields. - Click save.
- On the integration overview screen click
Activate.

- On the top right corner click
Allow. - You will receive the
Consumer key,Consumer secret,Access tokenandAccess token secret.
*You can select all the available resources for the integration to avoid any issues with the permissions. Or select the resources that you need for your specific use case. See the current available functionality of the app below in the documentation.
Connecting
- Navigate to Apps, and identify the Magento app. You can use search to find it.
- Click Add Connection.
- Name your connection for future reference e.g. ‘My organization’.
- Fill all the required fields:
Base URLConsumer keyConsumer secretAccess tokenAccess token secret
- Click Connect.
- Confirm that the connection has appeared and the status is Connected.

Actions
Blocks
- Search blocks - Retrieve all blocks that match the specified search criteria.
- Get block - Get block by specified ID.
- Get block as HTML - Get block by specified ID as HTML.
- Create block - Create block with specified data.
- Update block - Update block with specified data.
- Update block from HTML - Update block with specified ID from HTML. This action is useful in pair with the
Get block as HTMLaction when you need to get the block content as HTML and then translate the document. - Delete block - Delete block by specified ID.
Pages
- Search pages - Retrieve all pages that match the specified search criteria.
- Get page - Get page by specified ID.
- Get page as HTML - Get page by specified ID as HTML.
- Create page - Create page with specified data.
- Update page - Update page with specified data.
- Update page from HTML - Update page with specified ID from HTML. This action is useful in pair with the
Get page as HTMLaction when you need to get the page content as HTML and then translate the document. - Delete page - Delete page by specified ID.
Products
- Search products - Retrieve all products that match the specified search criteria.
- Get product - Get product by specified SKU.
- Get product as HTML - Get product by specified SKU as HTML. Using optional parameters you can specify
Custom attributesthat you want to include in the HTML. - Create product - Create product with specified data.
- Update product - Update product with specified data.
- Update product from HTML - Update product with specified SKU from HTML. This action is useful in pair with the
Get product as HTMLaction when you need to get the product content as HTML and then translate the document. - Delete product - Delete product by specified SKU.
- Add custom attribute - Allows you to add a custom attribute to a specific product.
Most actions also have an optional store view input. You can use this to determine in which store view an action should be executed.
Categories
- Get all categories - Get all categories.
- Get category - Get category by specified ID.
- Get categories for product - Get categories for product by specified SKU.
Events
- On products created - Triggered when new products are created.
- On products updated - Triggered when products are updated.
- On blocks created - Triggered when new blocks are created.
- On blocks updated - Triggered when blocks are updated.
- On pages created - Triggered when new pages are created.
- On pages updated - Triggered when pages are updated.
Events are based on a polling mechanism and are triggered periodically. The interval can be set in the bird editor. The interval should be between 5 minutes and 7 days.
Example

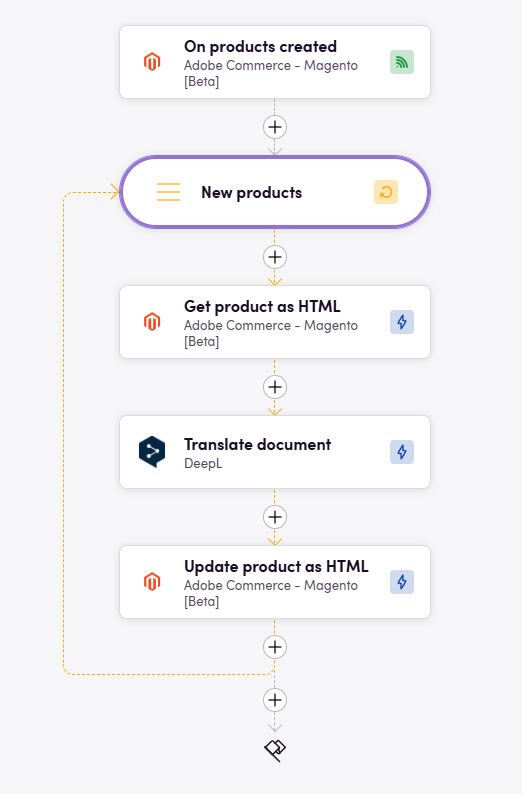
In the example above you see how you can create a bird that takes newly created products and automatically translates them using NMT.
Feedback
Do you want to use this app or do you have feedback on our implementation? Reach out to us using the established channels or create an issue.