AEM Cloud
AEM (Adobe Experience Manager) is a Content Management System (CMS) that allows users and organizations to easily build websites, apps, and manage web pages and content. AEM is used by developers and marketers to organize and distribute content across digital channels. This app supports both the on-premise version of AEM and the AEM as a Cloud Service version.
This app supports connecting to both AEM Cloud and on-premise versions of AEM.
Connecting to AEM Cloud
Prerequisites for connecting
Before connecting to AEM Cloud, ensure you have the following:
- An AEM Cloud instance running and accessible from the Blackbird platform.
- The Blackbird AEM plugin installed on your AEM instance. Distribution and installation instructions are available here (see prerequisites 1–8). An AEM maintainer or developer should perform this installation. If you use the on-premise version, follow these instructions.
- A technical account and a private key created for it, allowing you to obtain a certificate to connect to AEM (after installing the plugin). See the
Steps to Create Technical Accountsection below for instructions. - The base URL for your AEM environment (e.g.,
https://author-xxxx-xxxxx.adobeaemcloud.com).
Steps to create a technical account in AEM Cloud and obtain a certificate
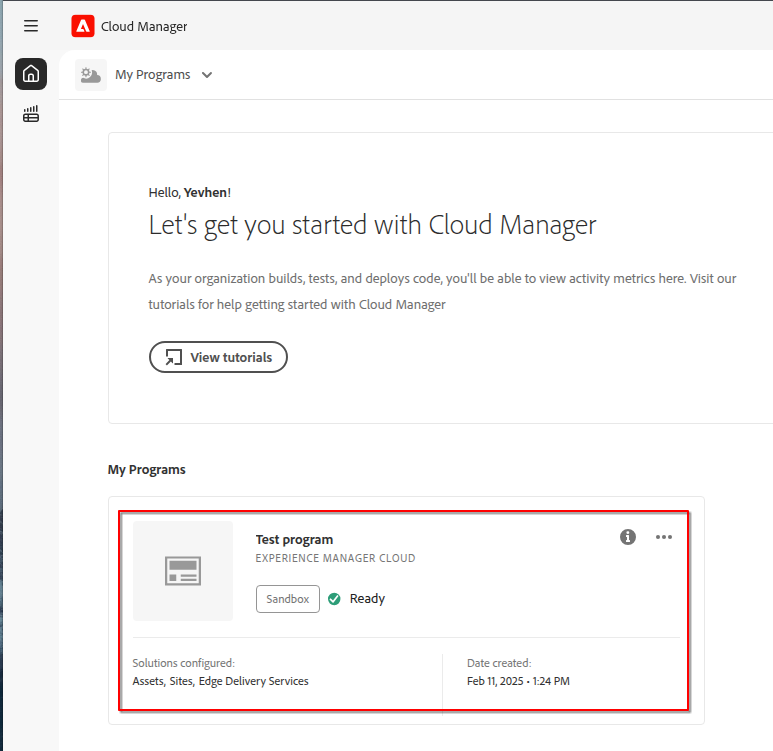
- Open Cloud Manager.
- Select the required program.
- Open the Developer Console for the required Author environment.
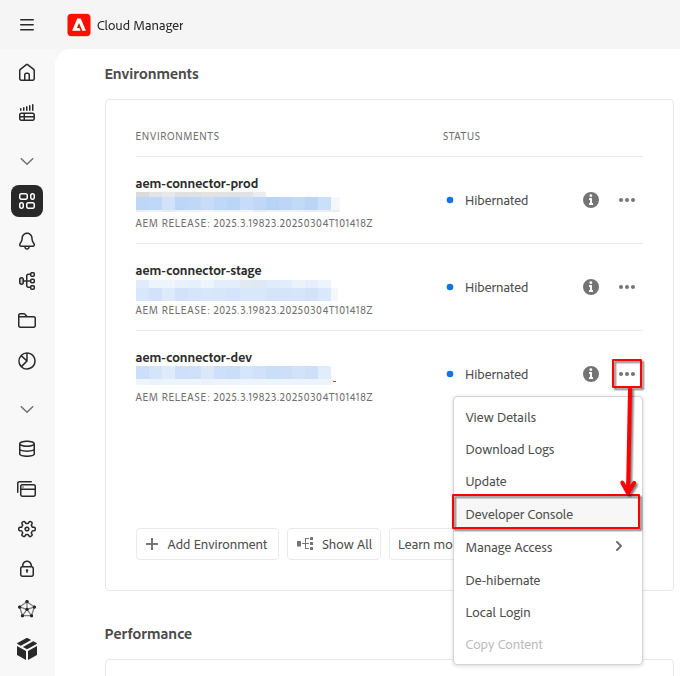
- Switch to the
Integrationstab and create a new technical account.
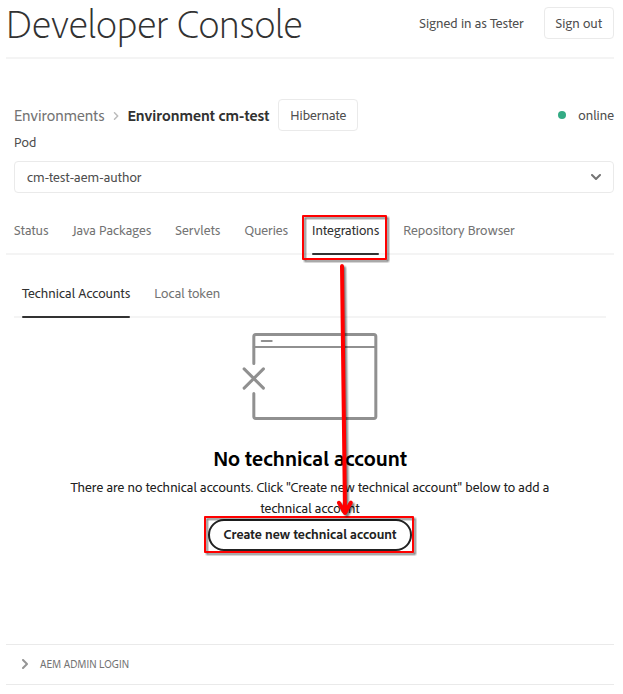
- Expand the created private key and click
Viewto see the data.
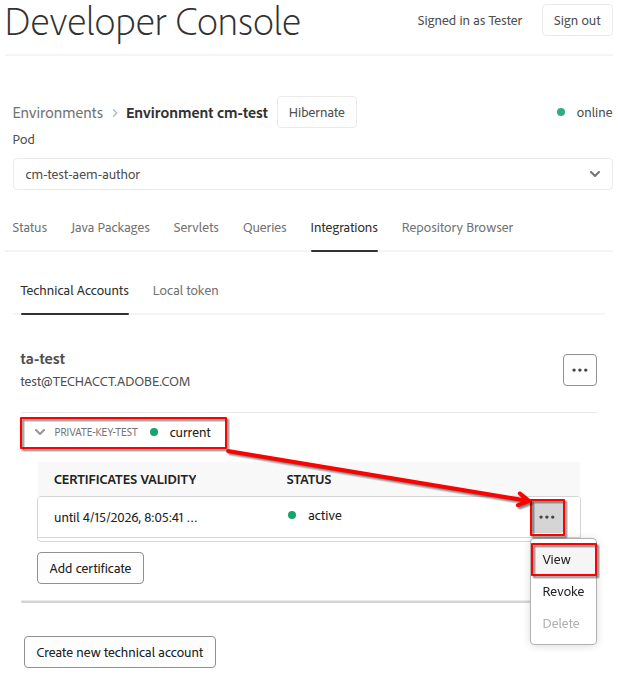
- Use the
Downloadbutton to obtain the raw data and store it in a file or another location for integration.

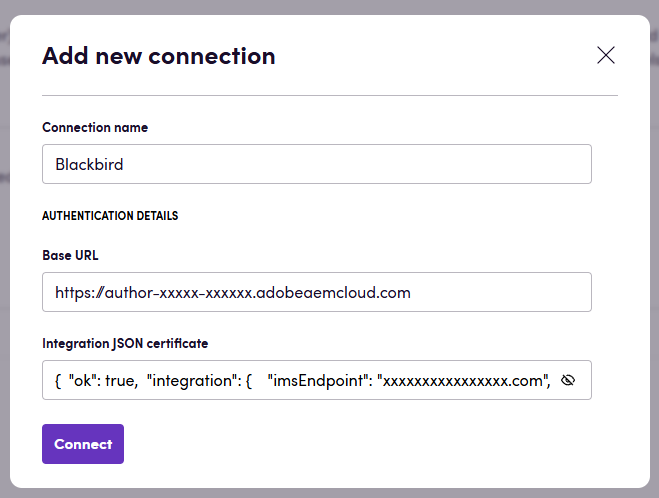
Adding an AEM Cloud connection in Blackbird
- Navigate to Apps and search for AEM.
- Click Add Connection.
- Name your connection for future reference (e.g., ‘My AEM’).
- Fill in the following fields:
- Base URL: Your AEM base URL (e.g.,
https://author-xxxx-xxxxx.adobeaemcloud.com) - Integration JSON certificate: The integration certificate in JSON format, found in the Developer Console. Example:
{ "ok": true, "integration": { "imsEndpoint": "ims-na1.adobelogin.com", ... }, "statusCode": 200 }
- Base URL: Your AEM base URL (e.g.,
- Click Connect.
- Confirm that the connection appears and the status is Connected.
Connecting to AEM On-Premise
Prerequisites for connecting to AEM On-Premise
Before connecting to AEM on-premise, ensure you have the following:
- An AEM instance running and accessible from the Blackbird platform.
- The Blackbird AEM plugin installed on your AEM instance. Distribution and installation instructions are available here (prerequisites 1–8). An AEM maintainer or developer should perform this installation.
- The base URL for your AEM environment (e.g.,
https://aem.example.com). - A username and password for the AEM instance. The user must have sufficient permissions to perform the required actions.
Adding an AEM On-Premise connection in Blackbird
- Navigate to Apps and search for AEM.
- Click Add Connection.
- Name your connection for future reference (e.g., ‘My AEM’).
- Fill in the following fields:
- Base URL: Your AEM base URL (e.g.,
https://aem.example.com) - Username: Your AEM username
- Password: Your AEM password
- Base URL: Your AEM base URL (e.g.,
- Click Connect.
- Confirm that the connection appears and the status is Connected.
Identifying content to translate
Blackbird relies on built-in AEM rules to determine which content to translate.
You can find and configure these rules in AEM under Tools > Operations > Translation Rules.
For more information on configuring translation rules, see the official documentation.
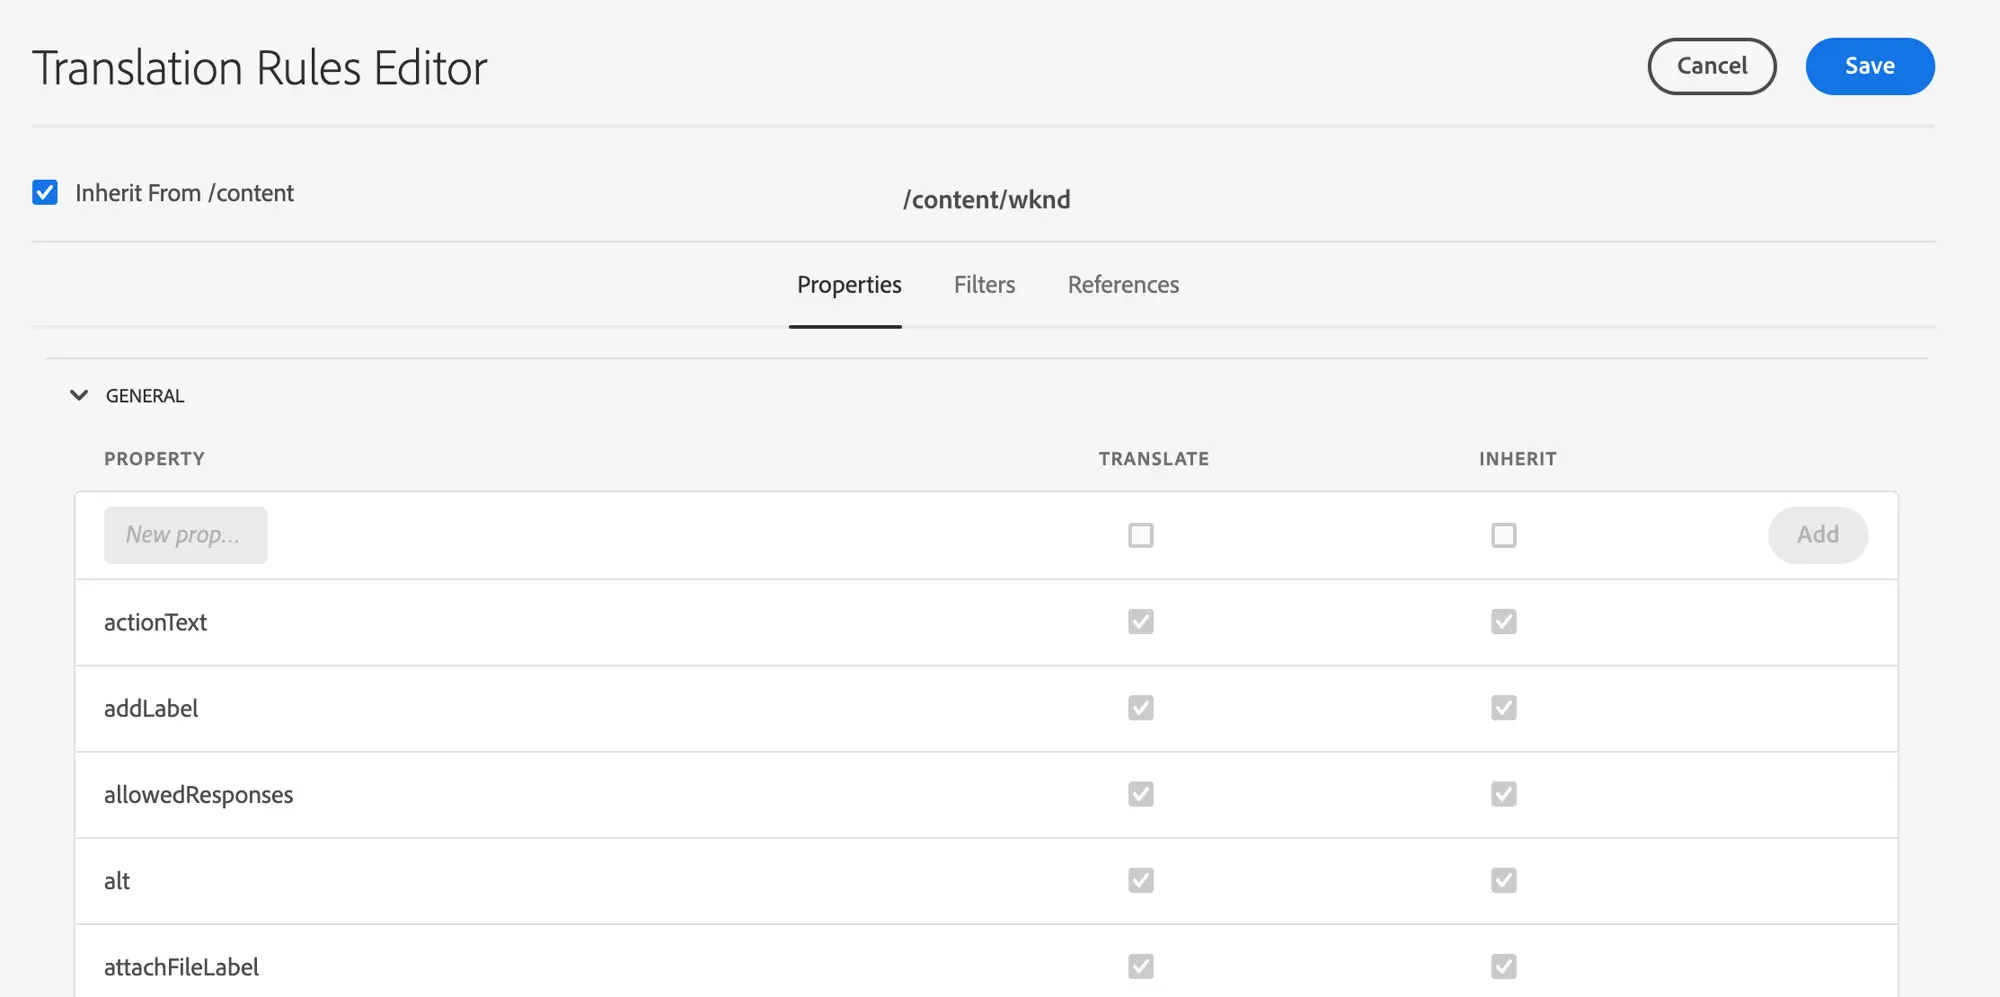
Adding support for custom components
While the general translation rules cover many standard component properties, they don’t automatically know about the specific fields in your custom-built AEM components. To ensure your custom content is translated, you must add specific rules for your component’s resource type.
Let’s use an example. Suppose you have a custom “Announcement” component, and you need to translate its tagline field.
Find the sling:resourceType of your component and the exact name of the property you want to translate. You can do this using CRXDE Lite by navigating to an instance of the component on a page.
In this example, the component node will have the following key information:
- Path:
/content/your-org/.../page-you-want-to-translate - Resource Type:
your-org/components/announcement - Property to translate:
tagline
Navigate to your project’s translation rules in the /content section, click “Add component” and add new component using sling:resourceType and propery name. Make sure to click Save button once you’ve finished configuration.

Actions
- Search content: Search for content based on provided criteria.
- Download content: Download content as HTML. Requires a content ID. This action supports the following optional input:
- Include reference content: If set to true, referenced content (other pages, content fragments, experience fragments, etc.) will be included in the downloaded HTML.
- Upload content: Upload content from HTML. Requires an HTML file and target path as input. This action supports the following inputs:
- Content (required): The interoperable HTML, XLIFF, or original JSON file to upload.
- Source language (required): The language path segment in the source content URL. Example: If your content path is
/content/my-site/en-us/page, specify/en-usas the source language. - Target language (required): The language path segment to replace the source language. Example: To convert from
/content/my-site/en-us/pageto/content/my-site/fr-fr/page, specify/fr-fras the target language. - Overwrite main content path (optional): Completely replaces the source content path to which language inputs will be applied. Useful for testing and requires “Skip references” to be set to true.
- Skip references (optional): If set to true, only the main (root) content item will be updated; reference content will not be updated.
- Ignore reference content errors (optional): When set to true, errors that occur while updating reference content will be ignored. Errors will be visible in the action output.
Events
- On content created or updated: Polling event that periodically checks for new or updated content. If any content is found, the event is triggered.
- On tag added: Periodically checks for new content with specified tags. If any content is found, the event is triggered.
Note on compatible content: Blackbird supports all content types in the default page hierarchy: pages, content fragments, experience fragments, assets, etc. Support for ‘Guides’ and ‘DITA’ content is currently in beta.
Example
Below is an example of how to set up a translation workflow with the AEM and DeepL apps to automatically translate content in AEM and send it to DeepL for translation.

Workflow steps:
- The
On content created or updatedevent is triggered every hour and checks for new or updated content in AEM. If any content is found, the event is triggered. - In the loop, the
Download contentaction downloads the content from AEM in HTML format. - The
Translate documentaction of theDeepLapp sends the downloaded content to DeepL for translation. - The
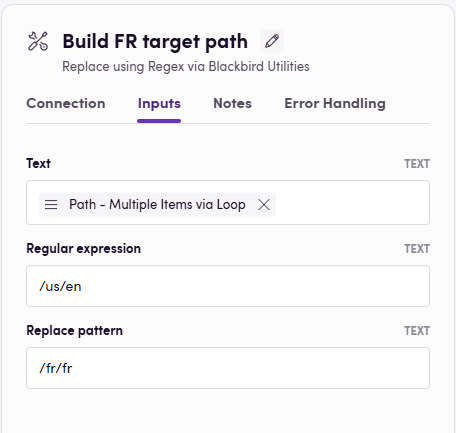
Replace using regexaction of theBlackbird Utilitiesapp replaces the original path with the target path in the translated content.
- The
Upload contentaction uploads the translated content back to AEM.
Demo video
This demo showcases a flexible and highly configurable alternative to a traditional AEM Connector using Blackbird.io.
With Blackbird, you can:
- Automatically pull content from Adobe Experience Manager (AEM)
- Orchestrate translation or transformation workflows
- Push localized or modified content back into AEM
- Add human checkpoints, AI enrichment, and custom routing
Unlike standard AEM connectors, Blackbird.io gives you full control over the process, with no-code configuration and enterprise-grade flexibility.
Feedback
Would you like to use this app or have feedback on our implementation? Reach out to us using the established channels or create an issue.