Azure OpenAI
Azure OpenAI Service provides access to advanced language models that you can customize for conversational AI, content creation, and data grounding.
Before setting up
Section titled “Before setting up”Before you can connect you need to make sure that:
- You have the
Resource URLfor your Azure OpenAI account. - You know
Deployment nameandAPI keyfor your Azure OpenAI account.
You can find how to create and deploy an Azure OpenAI Service resource here.
Connecting
Section titled “Connecting”- Navigate to Apps, and identify the Azure OpenAI app. You can use search to find it.
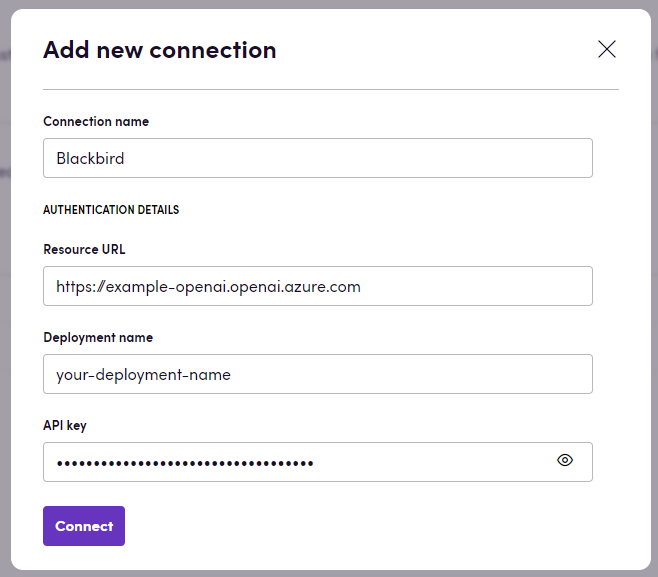
- Click Add Connection.
- Name your connection for future reference e.g. ‘My Azure OpenAI connection’.
- Enter the
Resource URL,Deployment name, andAPI keyfor your Azure OpenAI account. - Click Connect.
- Verify that connection was added successfully.
NOTE: Pay attention to your
Resource URLconnection parameter. Sometimes the correct url could have some path after a domain name. For example: https://example.openai.azure.com/**openai**
Actions
Section titled “Actions”Chat actions
Section titled “Chat actions”- Generate completion: Completes the given prompt.
- Chat: Gives a response given a chat message.
- Chat with system prompt: Gives a response given a chat message and a configurable system prompt.
- Create summary: Summarizes the input text.
- Generate edit: Edit the input text given an instruction prompt.
- Execute Blackbird prompt: Execute prompt generated by Blackbird’s AI utilities.
Translation-Related Actions
Section titled “Translation-Related Actions”- Post-edit MT: Review MT translated text and generate a post-edited version.
- Get translation issues: Review text translation and generate a comment with the issue description.
- Get MQM report: Perform an LQA Analysis of the translation. The result will be in the MQM framework form.
- Get MQM dimension values: Perform an LQA Analysis of the translation. This action only returns the scores (between 1 and 10) of each dimension.
- Translate text: Localize the text provided.
Audio Actions
Section titled “Audio Actions”- Create English translation: Generates a translation into English given an audio or video file (mp3, mp4, mpeg, mpga, m4a, wav, or webm).
- Create transcription: Generates a transcription given an audio or video file (mp3, mp4, mpeg, mpga, m4a, wav, or webm).
Image Actions
Section titled “Image Actions”- Generate image: Generates an image based on a prompt.
- Get localizable content from image : Extracts localizable content from an image.
Text Analysis Actions
Section titled “Text Analysis Actions”- Create embedding: Generate an embedding for a text provided. An embedding is a list of floating point numbers that captures semantic information about the text that it represents.
- Tokenize text: Tokenize the text provided. Optionally specify encoding: cl100k_base (used by gpt-4, gpt-3.5-turbo, text-embedding-ada-002) or p50k_base (used by codex models, text-davinci-002, text-davinci-003).
XLIFF Actions
Section titled “XLIFF Actions”Note, currently only gpt-4o version: 2024-08-06 supports structured outputs. This means that the actions that support XLIFF files can only be used with this model version. You can find the relevant information about supported models in the Azure OpenAI documentation.
-
Get Quality Scores for XLIFF file Gets segment and file level quality scores for XLIFF files. Supports only version 1.2 of XLIFF currently. Optionally, you can add Threshold, New Target State and Condition input parameters to the Blackbird action to change the target state value of segments meeting the desired criteria (all three must be filled).
Optional inputs:
- Prompt: Add your criteria for scoring each source-target pair. If none are provided, this is replaced by “accuracy, fluency, consistency, style, grammar and spelling”.
- Bucket size: Amount of translation units to process in the same request. (See dedicated section)
- Source and Target languages: By defualt, we get these values from the XLIFF header. You can provide different values, no specific format required.
- Threshold: value between 0-10.
- Condition: Criteria to filter segments whose target state will be modified.
- New Target State: value to update target state to for filtered translation units.
Output:
- Average Score: aggregated score of all segment level scores.
- Updated XLIFF file: segment level score added to extradata attribute & updated target state when instructed.
-
Post-edit XLIFF file Updates the targets of XLIFF 1.2 files
Optional inputs:
- Additional instructions: Add your linguistic criteria for postediting targets.
- Bucket size: Amount of translation units to process in the same request. (See dedicated section)
- Source and Target languages: By default, we get these values from the XLIFF header. You can provide different values, no specific format required.
- Glossary: Glossary file in TBX format. The glossary will be used to enhance the target text by incorporating relevant terms from the glossary where applicable.
- Update locked segments: If true, locked segments will be updated, otherwise they will be skipped. By default, this is set to false.
- Batch retry attempts: Number of attempts to retry the batch process in case of failure. By default, this is set to 2.
- Never fail: If true, the action will never fail even with the critical errrors, it will just return the exact same file as input and the error message. By default, this is set to true.
-
Process XLIFF file given an XLIFF file, processes each translation unit according to provided instructions (default is to translate source tags) and updates the target text for each unit. This action supports only version 1.2 and 2.1 of XLIFF currently.
Bucket size, performance and cost
Section titled “Bucket size, performance and cost”XLIFF files can contain a lot of segments. Each action takes your segments and sends them to the AI app for processing. It’s possible that the amount of segments is so high that the prompt exceeds the model’s context window or that the model takes longer than Blackbird actions are allowed to take. This is why we have introduced the bucket size parameter. You can tweak the bucket size parameter to determine how many segments to send to the AI model at once. This will allow you to split the workload into different API calls. The trade-off is that the same context prompt needs to be send along with each request (which increases the tokens used). From experiments we have found that a bucket size of 1500 is sufficient for models like gpt-4o. That’s why 1500 is the default bucket size, however other models may require different bucket sizes.
Batch processing
Section titled “Batch processing”You can use batch (async) actions to process large XLIFF files. The batch action will return a batch object that you can use to check the status of the processing by using Batch ID. Note that the model should be deployed as Global-batch. For more information on how to deploy a model as Global-batch, please refer to the Azure OpenAI documentation.
We will use the Deployment name (from the connection) as the model, so you need to make sure that the model is deployed as Global-batch and you provided the correct deployment name in the connection. An example of the deployment name is: organization-gpt-4o-globalbatch.
- (Batch) Process XLIFF file - Asynchronously process each translation unit in the XLIFF file according to the provided instructions (by default it just translates the source tags) and updates the target text for each unit.
- (Batch) Post-edit XLIFF file - Asynchronously post-edit the target text of each translation unit in the XLIFF file according to the provided instructions and updates the target text for each unit.
- (Batch) Get Quality Scores for XLIFF file - Asynchronously get quality scores for each translation unit in the XLIFF file.
To get the results of the batch processing, you can use the following actions:
- (Batch) Get results of the batch process - Get the results of the batch process. This action is suitable only for processing and post-editing XLIFF file and should be called after the batch process is completed.
- (Batch) Get quality scores results - Get the quality scores results of the batch process. This action is suitable only for getting quality scores for XLIFF file and should be called after the batch process is completed.
Note, that you should specify the correct original XLIFF file in Original XLIFF input. It will help us to construct the correct XLIFF file with updated target segments.
Example
Section titled “Example”Here is an example of how you can use the Azure OpenAI app in a workflow:
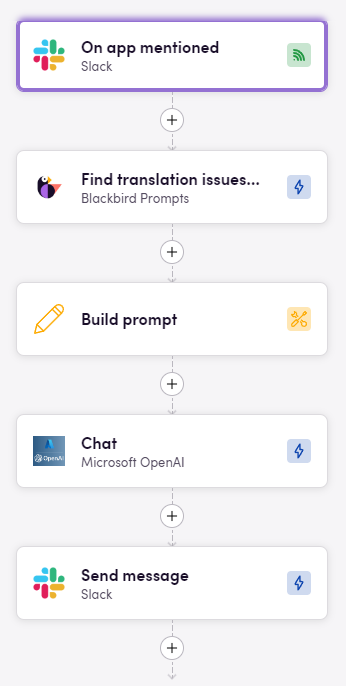
This workflow automates the process of handling a specific trigger in Slack. Here’s a step-by-step breakdown:
- On app mentioned (Slack): The workflow starts when the app is mentioned in a Slack channel.
- Find translation issues (Blackbird Prompts): It then uses Blackbird Prompts to find translation issues in the mentioned content.
- Build prompt: Next, it constructs a prompt based on the identified issues.
- Chat (Azure OpenAI): The constructed prompt is sent to Azure OpenAI to generate a response or solution.
- Send message (Slack): Finally, the response from OpenAI is sent back as a message in the Slack channel.
Feedback
Section titled “Feedback”Do you want to use this app or do you have feedback on our implementation? Reach out to us using the established channels or create an issue.