AI Translate from file storage
Blueprints: Starting Points for Your Birds
In Blackbird, Blueprints are the seeds of your workflows. They represent the initial ideas that have the potential to become fully-fledged Birds.
In this Blueprint-guide, let’s explore some options to integrate cloud storage with machine translation, potentially with adding an AI post-edit step.
Getting started
- From the Blueprints menu, either select Translate files from file storage or Translate & Edit files from file storage.
- Select your Apps. This Blueprint works with a file storage App and an AI Translation App.
- Click Create Bird.
- If necessary, configure your Connection, set the language(s) you want to translate and select the source and target folders (see tips below).
Workflow Outline
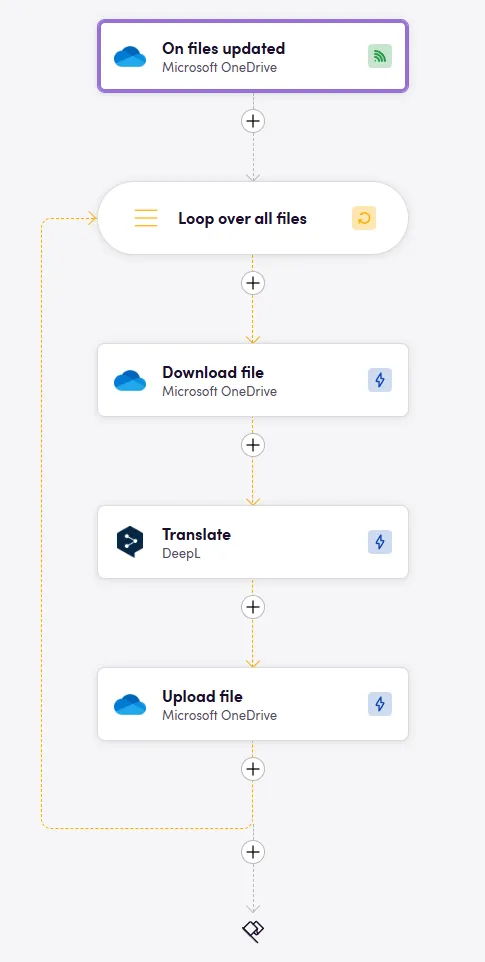
- Trigger: File(s) updated in cloud storage Users upload files to a chosen cloud storage application. This action sets our workflow into motion.
- File download Files are downloaded from the cloud storage.
- AI translation The downloaded files are sent to an AI translation engine for quick processing.
- Translated file upload Translated files are uploaded back to the cloud storage, placed in a designated output folder.
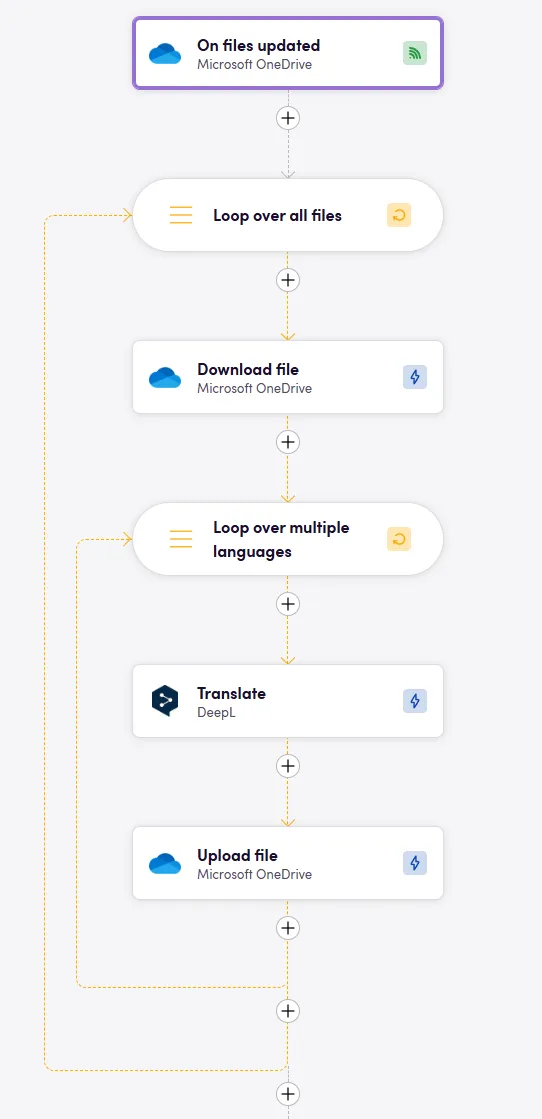
Bird between Onedrive and DeepL
Tips
- Polling Events: Some Apps use polling instead of webhooks to detect updated/new files. Check for an Interval tab when setting up your trigger and choose the appropriate time for you (between 5 minutes and 7 days).
- Glossary Integration: Whenever the AI App allows it, users can add glossaries to enhance translation accuracy and consistency. Glossaries can be exported from a number of apps, and Blackbird will ensure compatibility (Apps include TMS & CAT tools, Microsoft Excel sheets, DeepL, OpenAI).
- Target language: You can select a language from the dynamic inputs of the AI App you are using. You can also use operators to cycle through a list of predefined languages. If you wnat to translate into multiple languages, create another loop with all the languages as input. Alternatively, you can also fetch this information from another app/action. It all depends on what your process looks like.
- Optional parameters: Many AI Apps offer different parameters to be set, such as dictionaries, formality, and custom engine. Check the input tab for all steps.
- Output folder setup: When uploading your files back to the cloud storage of your choice, ensure to set up a new folder to prevent overwriting your original files or creating an infinite loop where translated files serve as a new trigger and are reprocessed.
Important Make sure your watched source folder is not the same as the folder you put the translations into. This would cause the Bird to fly in an infinite loop.
- Use the correct input: When re-uploading your file, be certain to select the correct input. If you choose the exported file, then you will be re-importing the same exact file, without changes. Choose the output file from the translate action instead.
- Loops are needed: Whether to iterate through a list of target languages or to send each file within a group of downloaded files to an action that only takes one at a time, loops are the key.
- File renaming: You can change the name of files before re-uploading them. If you want to append the target language code at the end of your file name or indicate through the file name that it has been MTed, you can use the Utilities app or other helpers. There is a downloadable workflow example for this at the bottom of the page.
Apps
Cloud Storage
AI Translation
Examples
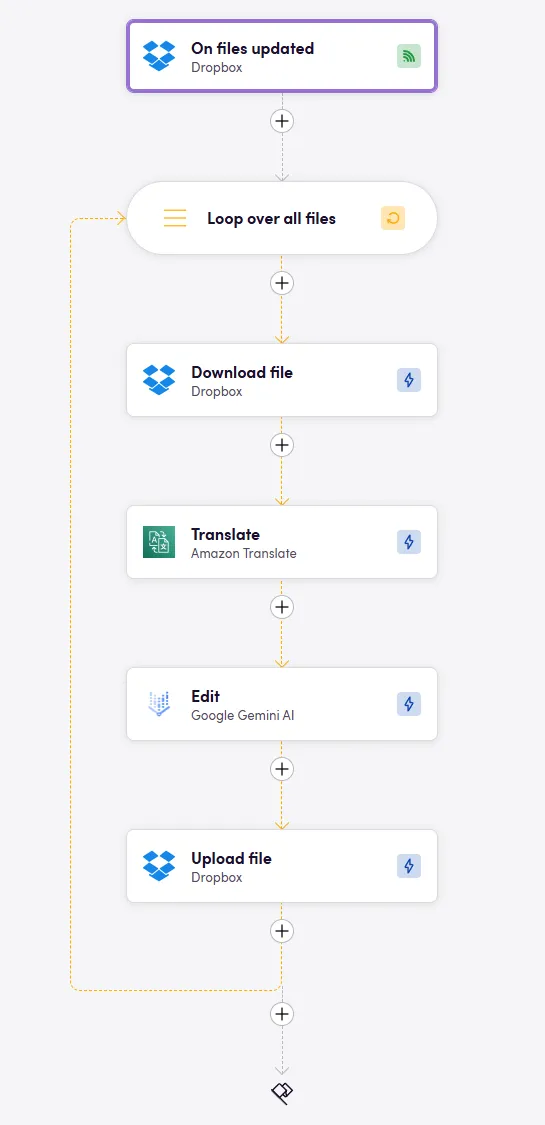
Example of the Edit variant where we use an AI to do another post-editing step.
Translating into multiple languages